Customize the Enterprise Portal (Beta)
This topic describes how to customize the Enterprise Portal, including using a custom domain, changing the branding, editing the content of invitation and notification emails, and adding custom documentation.
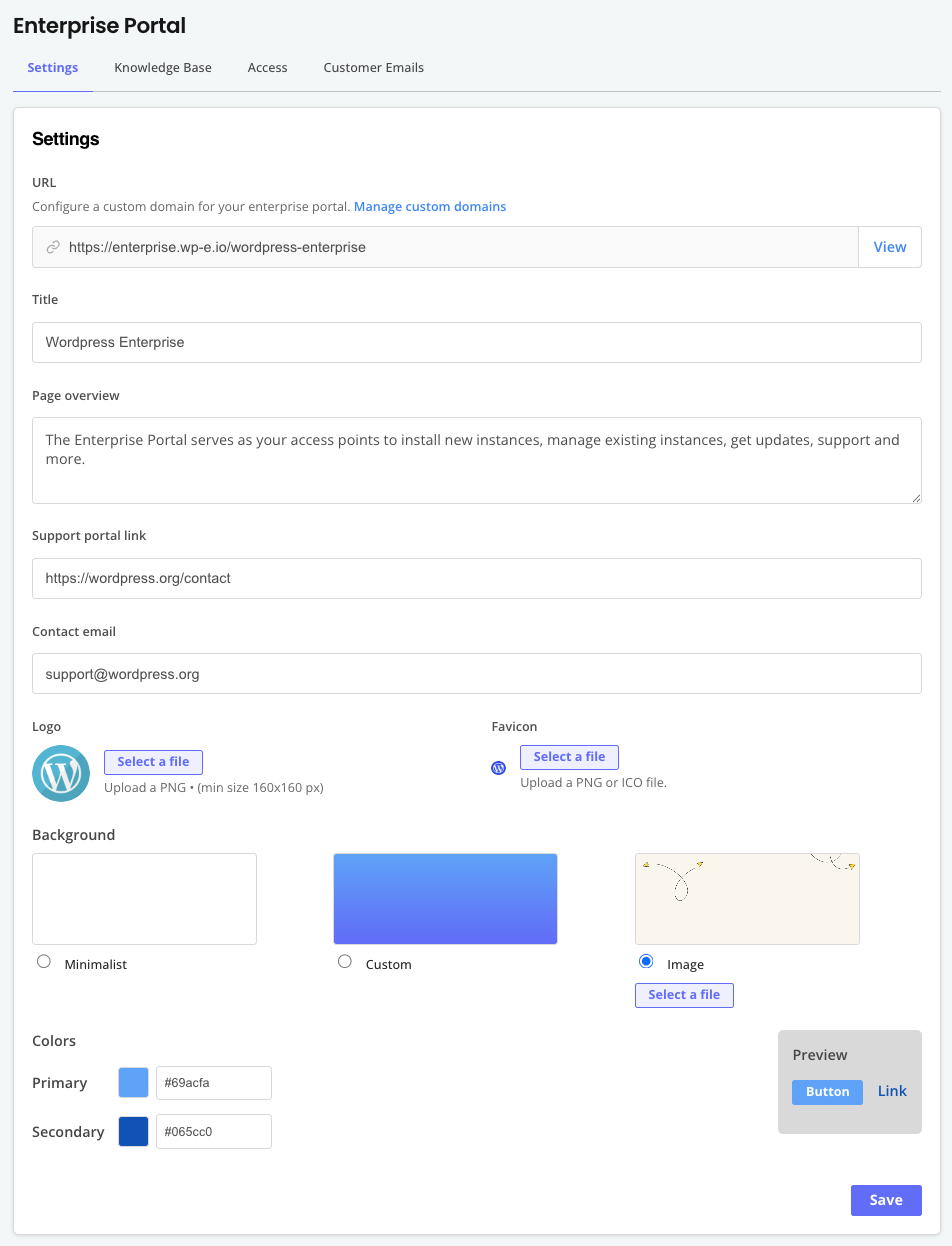
Manage Enterprise Portal Settings
You can edit the settings for the Enterprise Portal to use a custom domain, provide custom links and contact information, customize the look and feel of the Enterprise Portal, and more.
To manage Enterprise Portal settings:
-
In the Vendor Portal, go to Enterprise Portal > Settings.
-
Edit the settings as desired:
Field Description URL The URL where customers can access the Enterprise Portal. You can change the URL to use a custom domain. For information, see Use Custom Domains. Title The title of the Enterprise Portal. The title is displayed at the top of each page in the Enterprise Portal and is also used in email notifications. Page overview An overview of the Enterprise Portal. Support portal link The URL for the portal that your customers can use to get support. This link is provided on the Enterprise Portal Support page. Contact email The email address that customers can use to contact you. This email address is provided on the Enterprise Portal Support page. Logo Upload a custom PNG logo for the Enterprise Portal. The minimum size for the logo is 160px by 160px. Favicon Upload a custom favicon for the Enterprise Portal. The favicon is displayed in the browser tab. Background Select or customize the background for the Enterprise Portal. Colors Set the primary and secondary colors for the Enterprise Portal. -
Click Save.
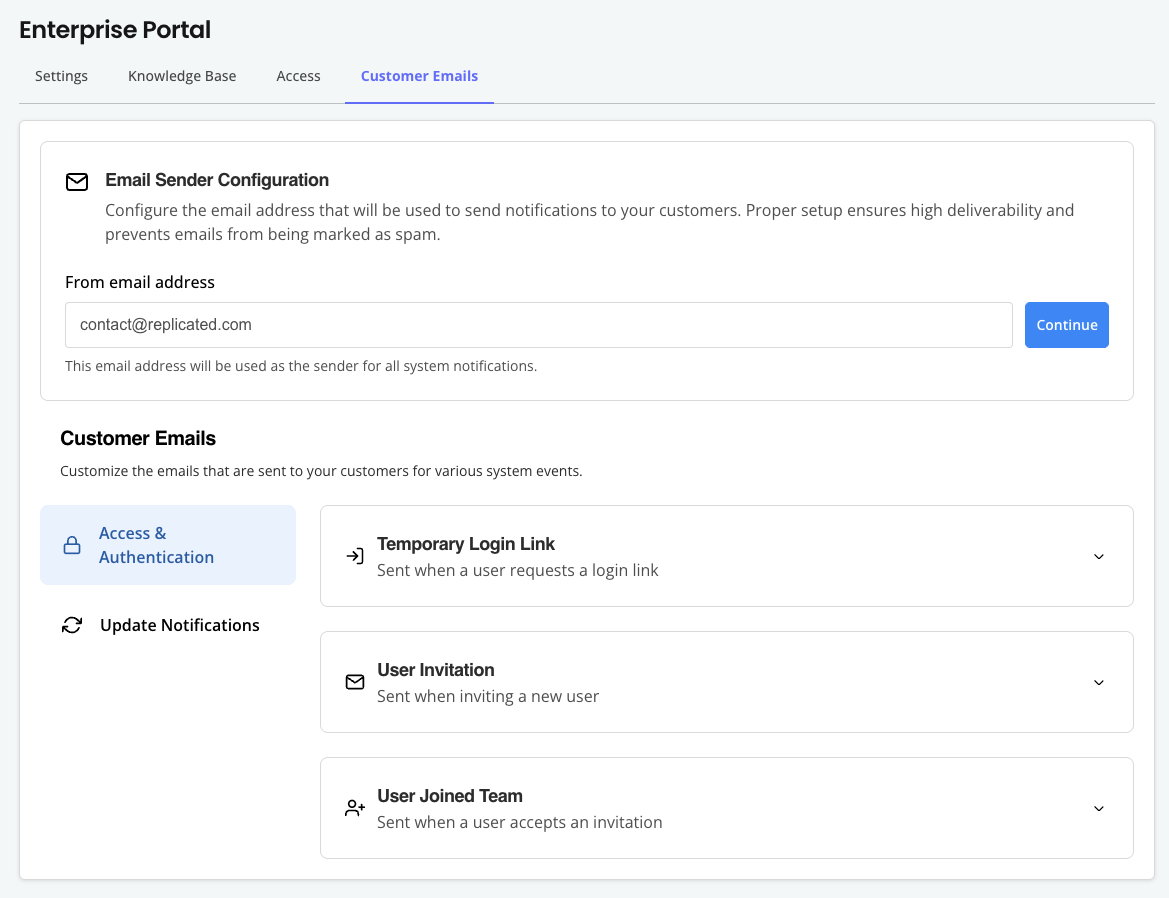
Configure Invitation and Notification Emails
You can customize the the content and styling of the invitation and notification emails that are sent to your customers.
To configure customer emails:
-
In the Vendor Portal, go to Enterprise Portal > Customer emails.
-
For Email Sender Verification, in From email address, add the email address that you want to use as the sender for all system notifications sent to your customers, then click Continue. Adding a sender address helps ensure that your emails are delivered and are not marked as spam.
After the domain is verified automatically, the email address is displayed under Verified Sender Address.
-
For Customer Emails, customize the subject line and body of the emails that are sent to your customers for various system events. You can also customize the default style component to change things like color and font. Click Preview to see a preview of your changes.

Add a Link to Documentation
For each of your supported install types, you can add a link your installation documentation. The link you provide is displayed on the Enterprise Portal Install page.
To add a link to your documentation in the Enterprise Portal:
-
In the Vendor Portal, go to Enterprise Portal > Knowledge Base.
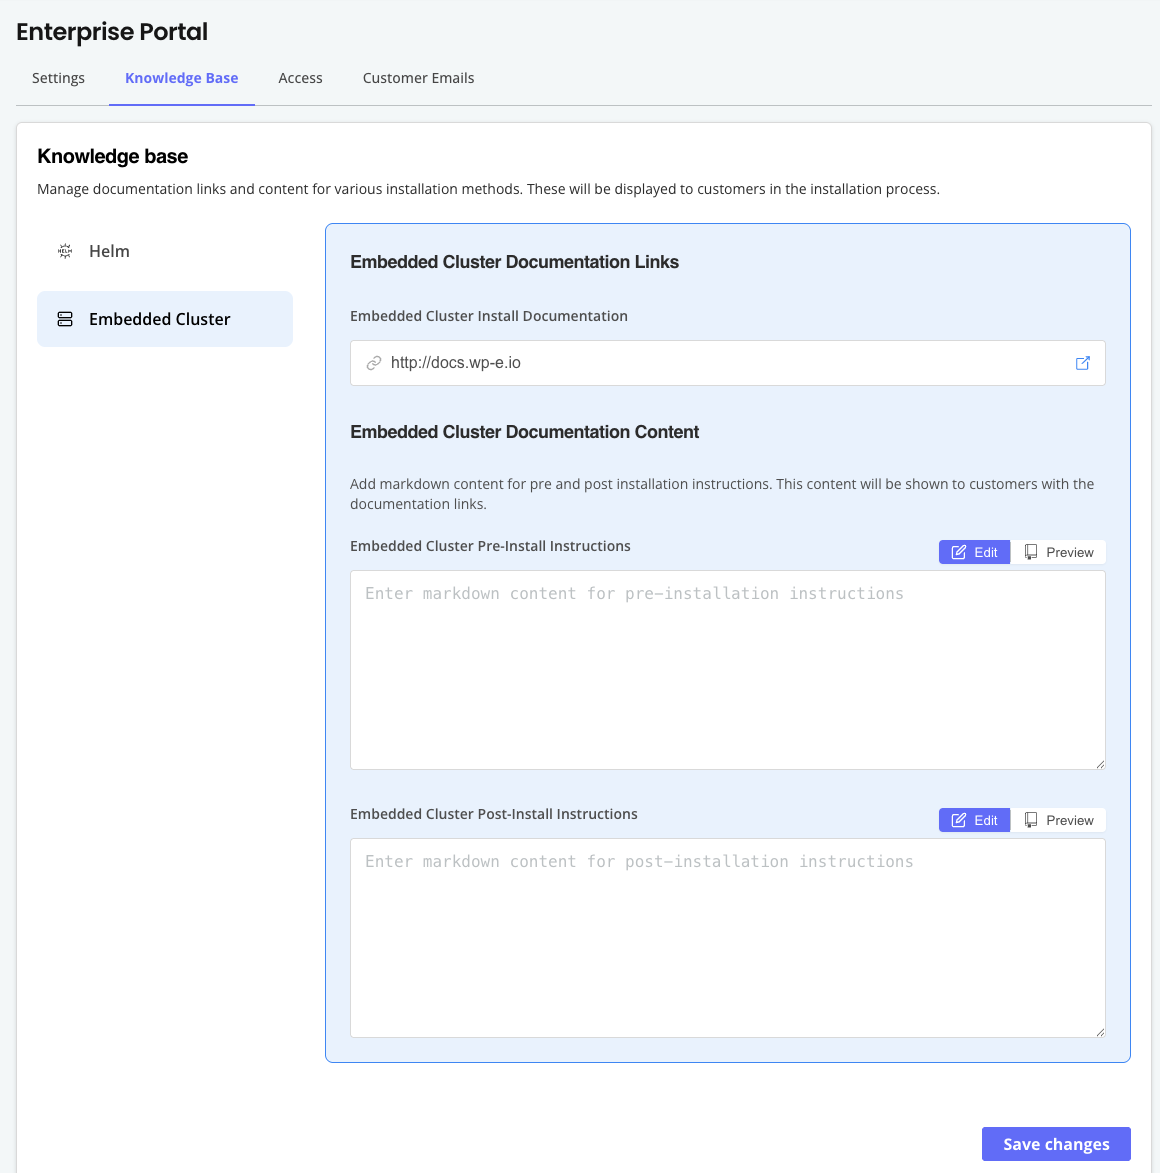
-
In the panel on the left, select the installation type.
-
In the documentation links section, add a link to your application install documentation.
-
Click Save changes.
Add Pre- and Post-Install Instructions
For each of your supported install types, you can add custom pre- and post-install instructions for users. This is useful if there are additional prerequisites or follow-up steps that users need to complete in addition to the primary installation instructions.
The same pre- and post- instructions are shown for all your release channels. To add channel-specific instructions, see Customize Channel-Specific Install Instructions.
To customize the pre- and post-install instructions for your application:
-
In the Vendor Portal, go to Enterprise Portal > Knowledge Base.
-
In the panel on the left, select the installation type.
-
In the documentation content section, add pre- and post-installation instructions in markdown format. Click Preview to see a preview of your changes.
-
Click Save changes.
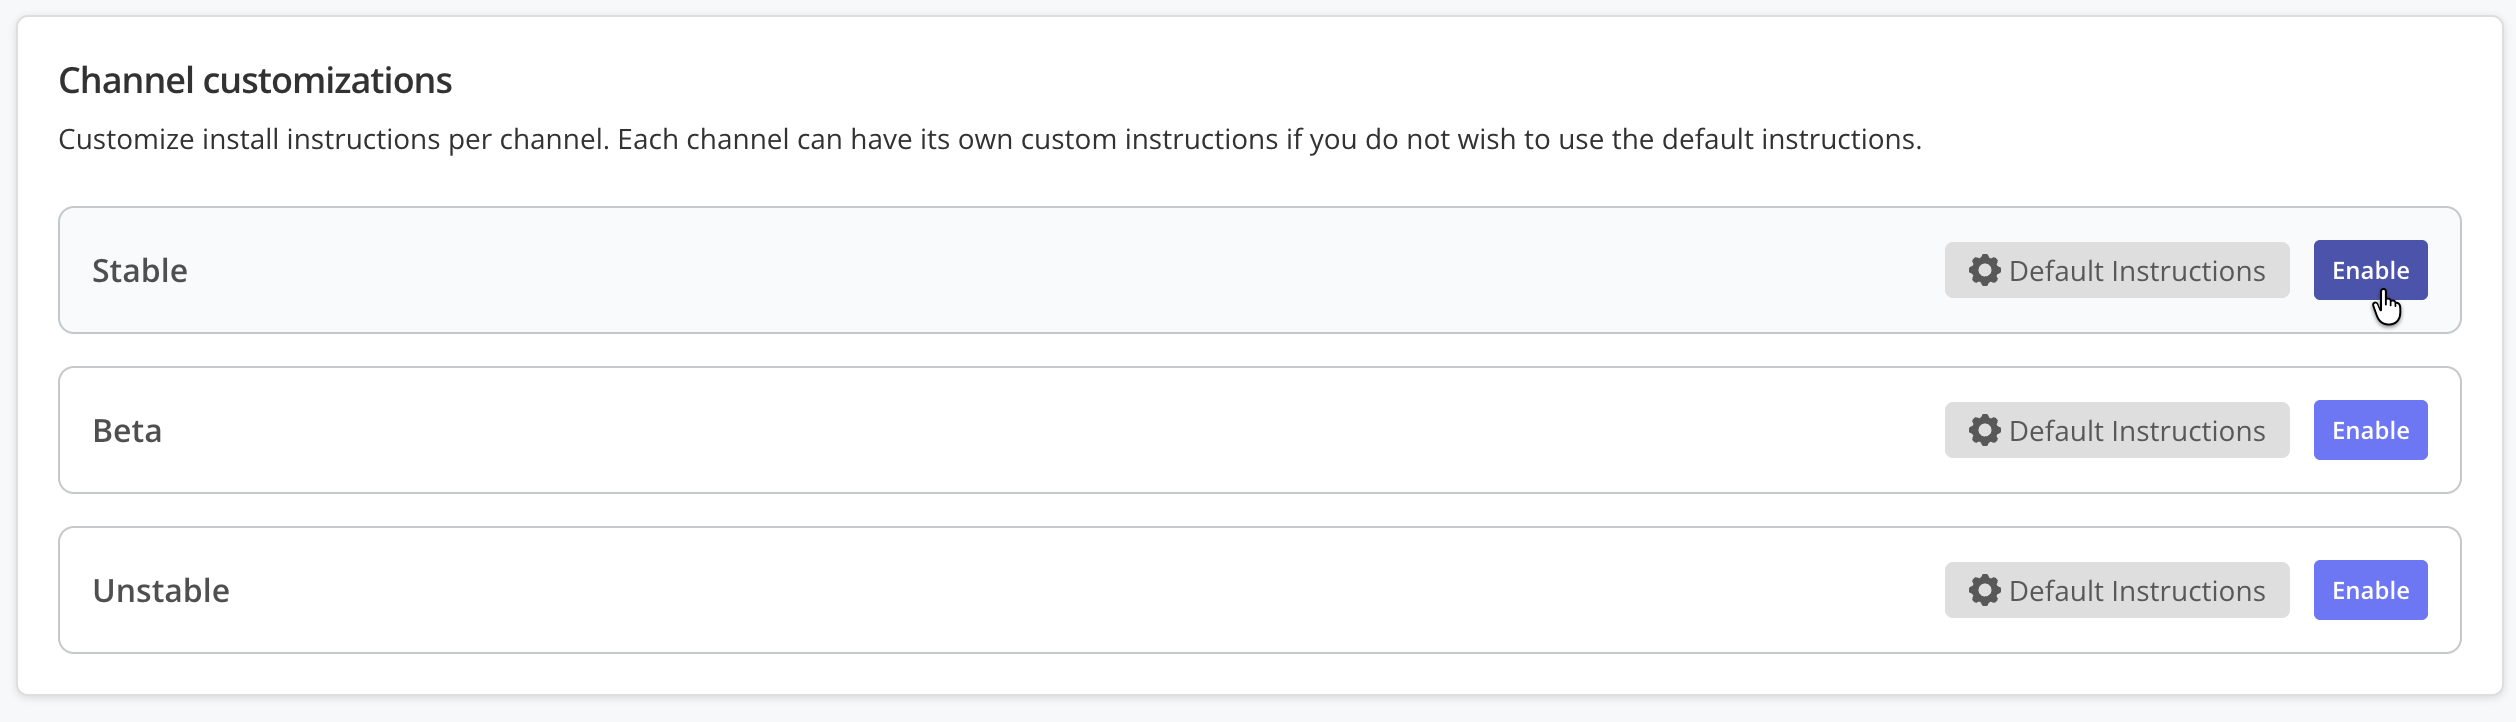
Customize Channel-Specific Install Instructions (Alpha)
Custom install instructions are Alpha and subject to change. To access this feature, a feature flag must be enabled for your team. For more information, reach out to your Replicated account representative.
By default, the installation instructions available in the Enterprise Portal are automatically generated based on the install types and options enabled in the customer's license. These default installation instructions are the same across all release channels. For more information about managing the install types and options, see Manage Install Types for a License.
You can also write custom, channel-specific instructions. This is useful if you need to provide unique installation steps for any of your release channels. For example, you can add custom steps, rename steps or sections to match your documentation, include videos or diagrams, and more.
These custom installation instructions support MDX. MDX is a format that combines Markdown with JSX, allowing you to use components and template variables in your instructions. MDX templates support the following:
- Template variables: Access dynamic data like application name, release version, registry settings, and customer inputs
- Built-in UI components: Use UI components like code blocks, alerts, tabs, and progress indicators
- Conditional rendering: Conditionally show or hide content. For example, show or hide certain steps based on the installation options supported by the customer's license
Customize Channel-Specific Instructions
To customize channel-specific installation instructions:
-
In the Vendor Portal, go to Enterprise Portal > Knowledge Base.
-
Scroll to the Channel customizations section.
-
For the channel where you want to customize instructions, click Enable.
-
In the MDX template editor, write your custom installation instructions using Markdown, template variables, and MDX components.
The editor provides autocomplete for available template variables and components. Start typing
{for template variables or<for MDX components to see suggestions. For more information about the available variables and components, see Supported MDX Template Variables and Supported MDX Components below.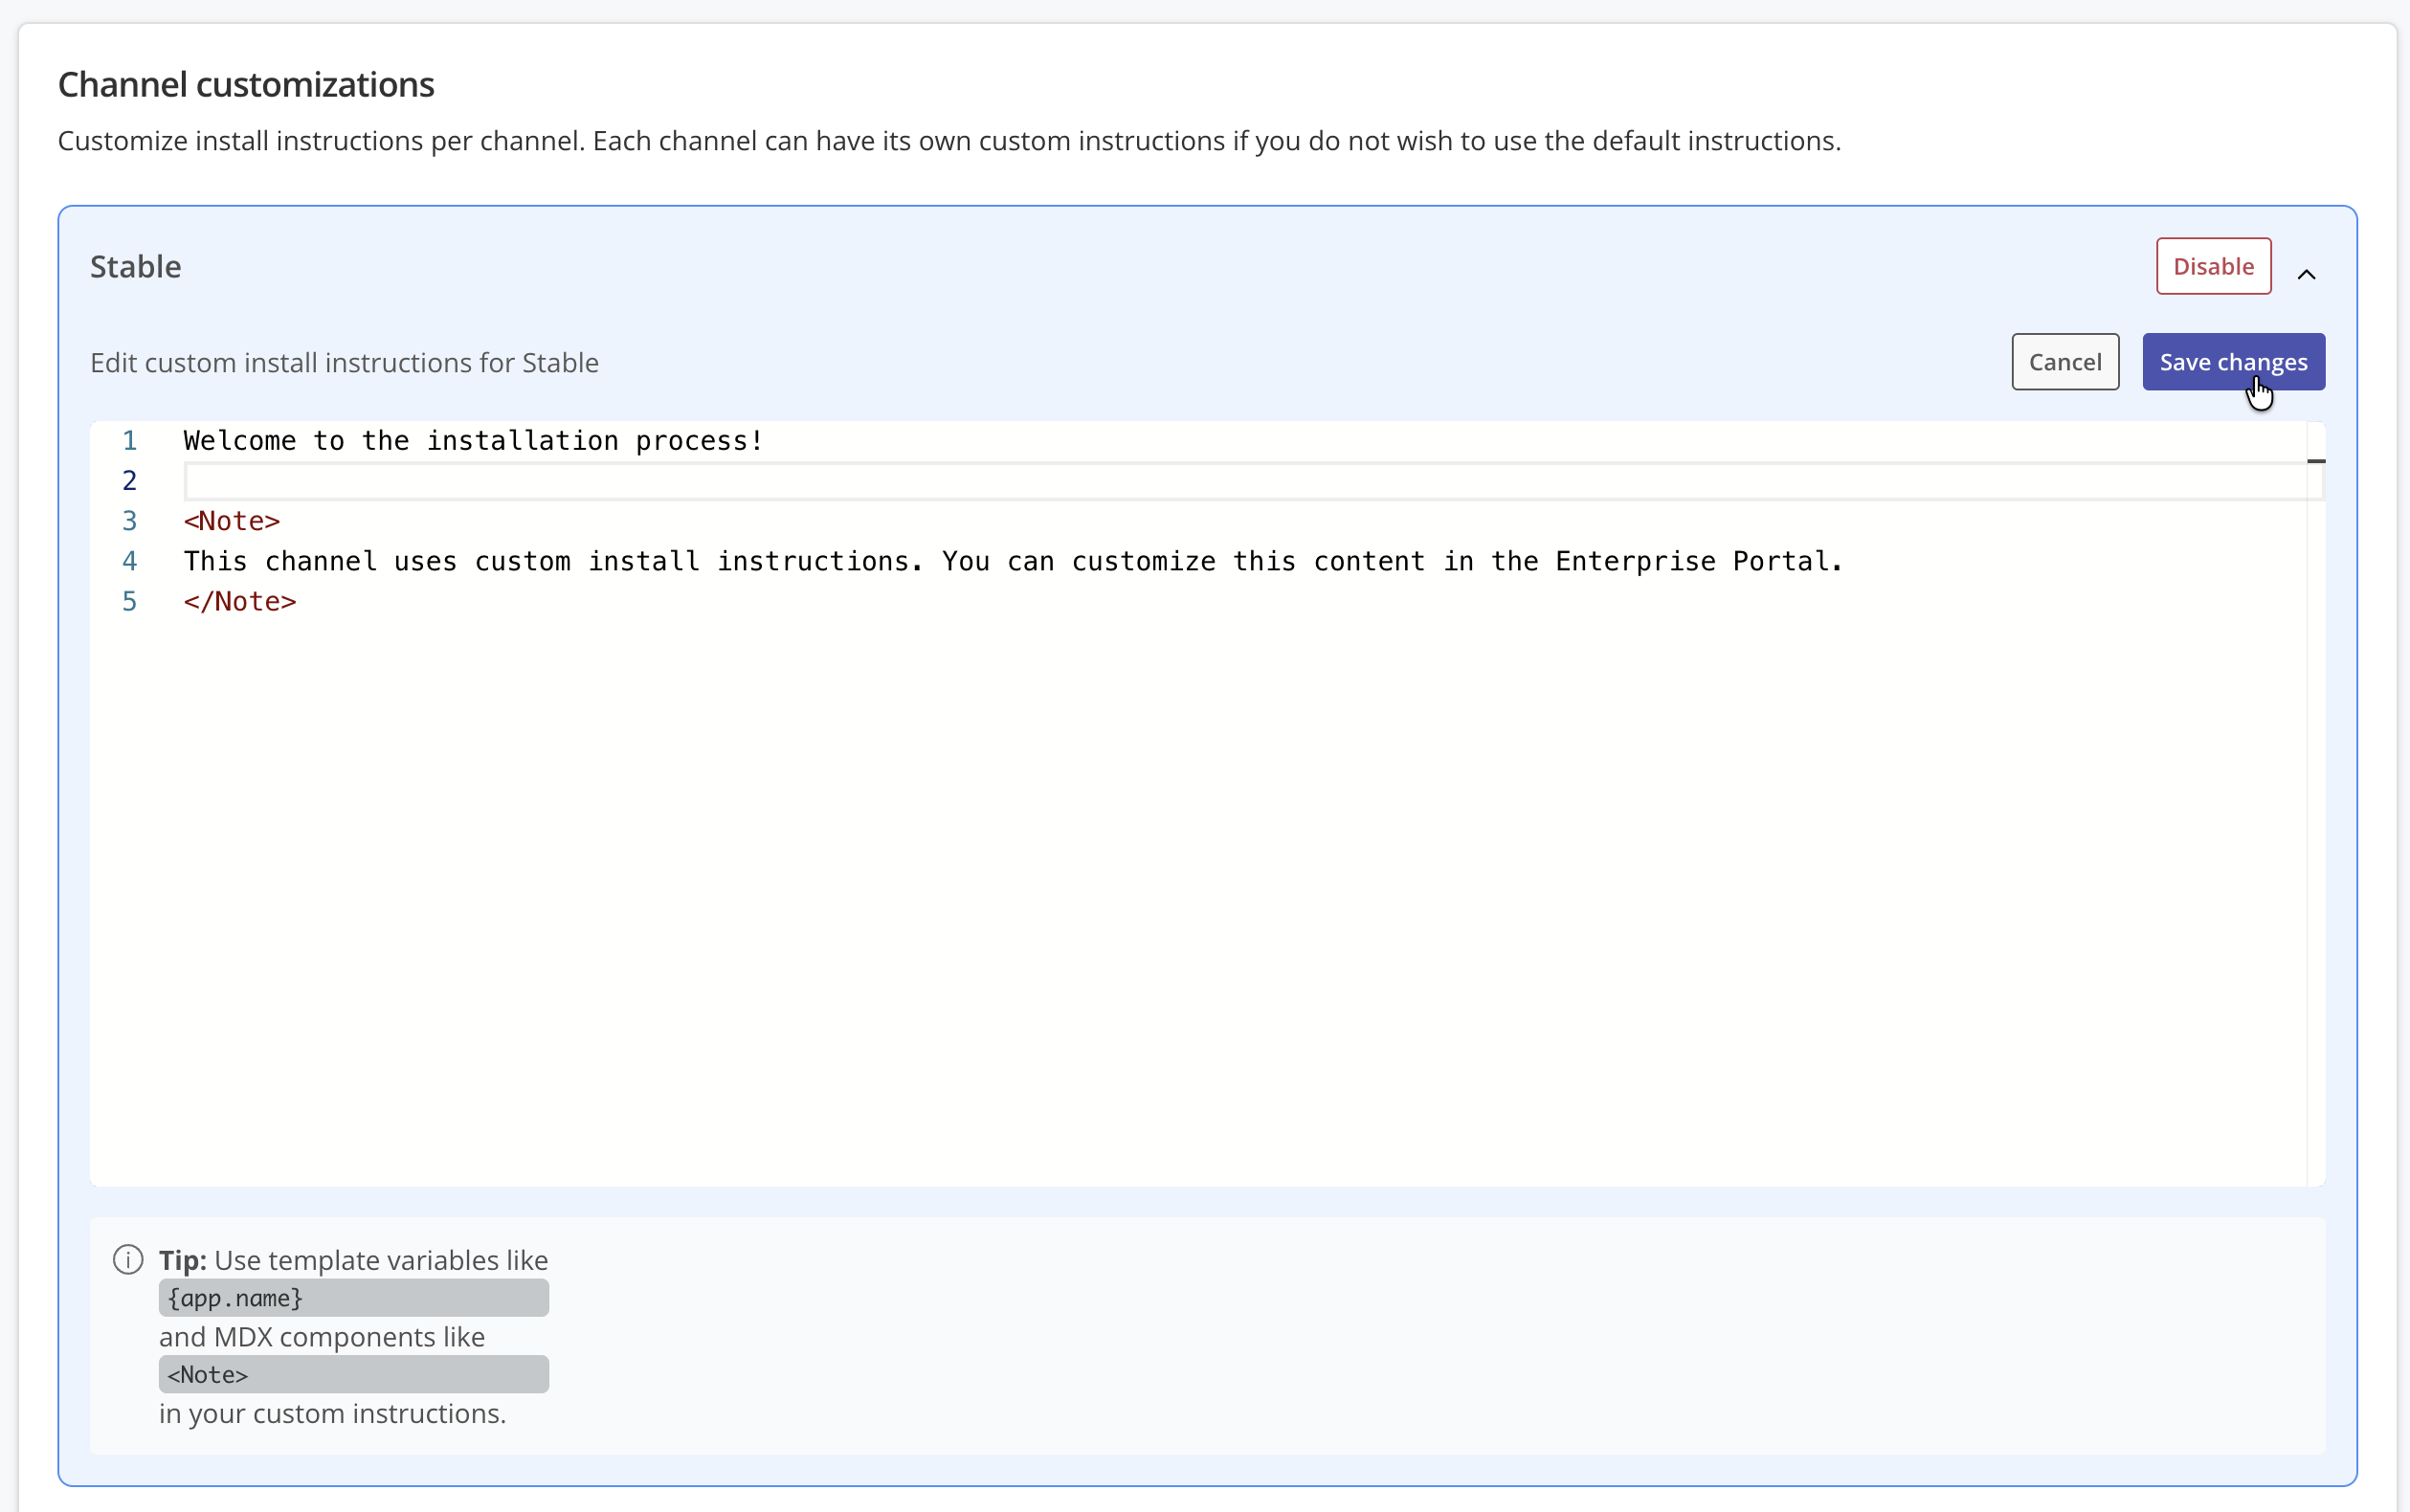
-
Click Save changes to save your custom installation instructions.
Revert to Default Instructions
To disable custom instructions for a channel and revert to the default automatically-generated instructions:
-
In the Channel customizations section, select the channel.
-
For the target channel, click Disable. When channel customizations are disabled, the Enterprise Portal shows the default installation instructions for the channel.
noteYour custom documentation is saved in the Channel customizations MDX template editor. You can enable the custom instructions again by clicking Enable for the channel.
Supported MDX Template Variables
For a complete list of available variables, use the autocomplete feature in the editor.
The following describes some of the supported MDX template variables:
| Variable | Description | Example |
|---|---|---|
{app.name} | Application name | My Application |
{app.slug} | Application slug (identifier) | my-app |
{channel.name} | Channel name | Stable |
{channel.slug} | Channel slug | stable |
{release.versionLabel} | Release version number | 1.2.3 |
{release.sequence} | Release sequence number | 42 |
{installOptions.adminConsoleUrl} | Admin Console URL (user input, dynamic) | https://admin.example.com |
{installOptions.proxyUrl} | HTTP/HTTPS proxy URL (user input, dynamic) | https://proxy.example.com:8080 |
{installOptions.privateRegistryUrl} | Private registry hostname (user input, dynamic) | registry.example.com:5000 |
{branding?.title} | Enterprise Portal title (optional) | MyApp Enterprise Portal |
{branding?.primaryColor} | Primary brand color (optional) | #4a53b0 |
{branding?.supportPortalLink} | Support portal URL (optional) | https://support.example.com |
{installation.licenseId} | Customer license ID | 2cHXb1RCttzpR0xvnNWyaZCgDBP |
{installation.serviceAccountId} | Service account identifier | 2cHXb1RCttzpR0xvnNWyaZCgDBP |
{images.raw} | Array of image names without registry (Helm only) | ["nginx:1.19", "postgres:13"] |
{images.full} | Array of complete image references (Helm only) | ["registry.replicated.com/..."] |
Supported MDX Components
The following components are available in MDX templates. For examples of each component, see Example below.
Text and Formatting
| Name | Description | Props |
|---|---|---|
<Note>, <Tip>, <Warning>, <Info> | Display callout boxes with different styles. | icon (boolean, optional): Show or hide the icon in the callout. |
<Alert> | General purpose alert with customizable type |
|
<InlineCode> | Display inline code. To use template variables inside CodeBlock, wrap them in template literals using curly braces: Limitation: Dynamic user input variables (like | None |
<CodeBlock> | Display multi-line code blocks with syntax highlighting. To use template variables inside CodeBlock, wrap them in template literals using curly braces: Limitation: Dynamic user input variables (like |
|
<CommandBlock> | Display shell commands with copy functionality. To use template variables inside CommandBlock, wrap them in template literals using curly braces: Limitation: Dynamic user input variables (like |
|
Layout
| Name | Description | Props |
|---|---|---|
<Tabs> | Create tabbed content sections | defaultActiveTab (number, optional): Index of initially active tab |
<Tab> | Individual tab within a Tabs container | title (string, required): Tab label text |
<Accordion> | Create collapsible content sections | title (string, required), defaultOpen (boolean, optional) |
<ConditionalRender> | Show or hide content based on conditions | when (string, required): JavaScript expression to evaluate |
Installation Components
| Name | Description | Props |
|---|---|---|
<InstallStep> | Numbered installation step |
|
<Prerequisites> | Display prerequisites section | title (string, optional): Custom title for the section |
<Troubleshooting> | Display troubleshooting section | title (string, optional): Custom title for the section |
Input Components
| Name | Description | Props |
|---|---|---|
<ProxyURLInput> | Collect proxy URL from user |
|
<PrivateRegistryInput> | Collect registry credentials |
|
<AdminConsoleURLInput> | Collect Admin Console URL |
|
Display Components
| Name | Description | Props |
|---|---|---|
<SupportLink> | Link to support resources |
|
MDX Templates Restrictions
MDX templates are validated for security before being saved. The following restrictions apply:
- Only approved MDX components can be used
- JavaScript code execution is not allowed
- External script imports are blocked
- Dangerous HTML elements (script, iframe, embed) are not allowed
- Template size is limited to 1MB
Example
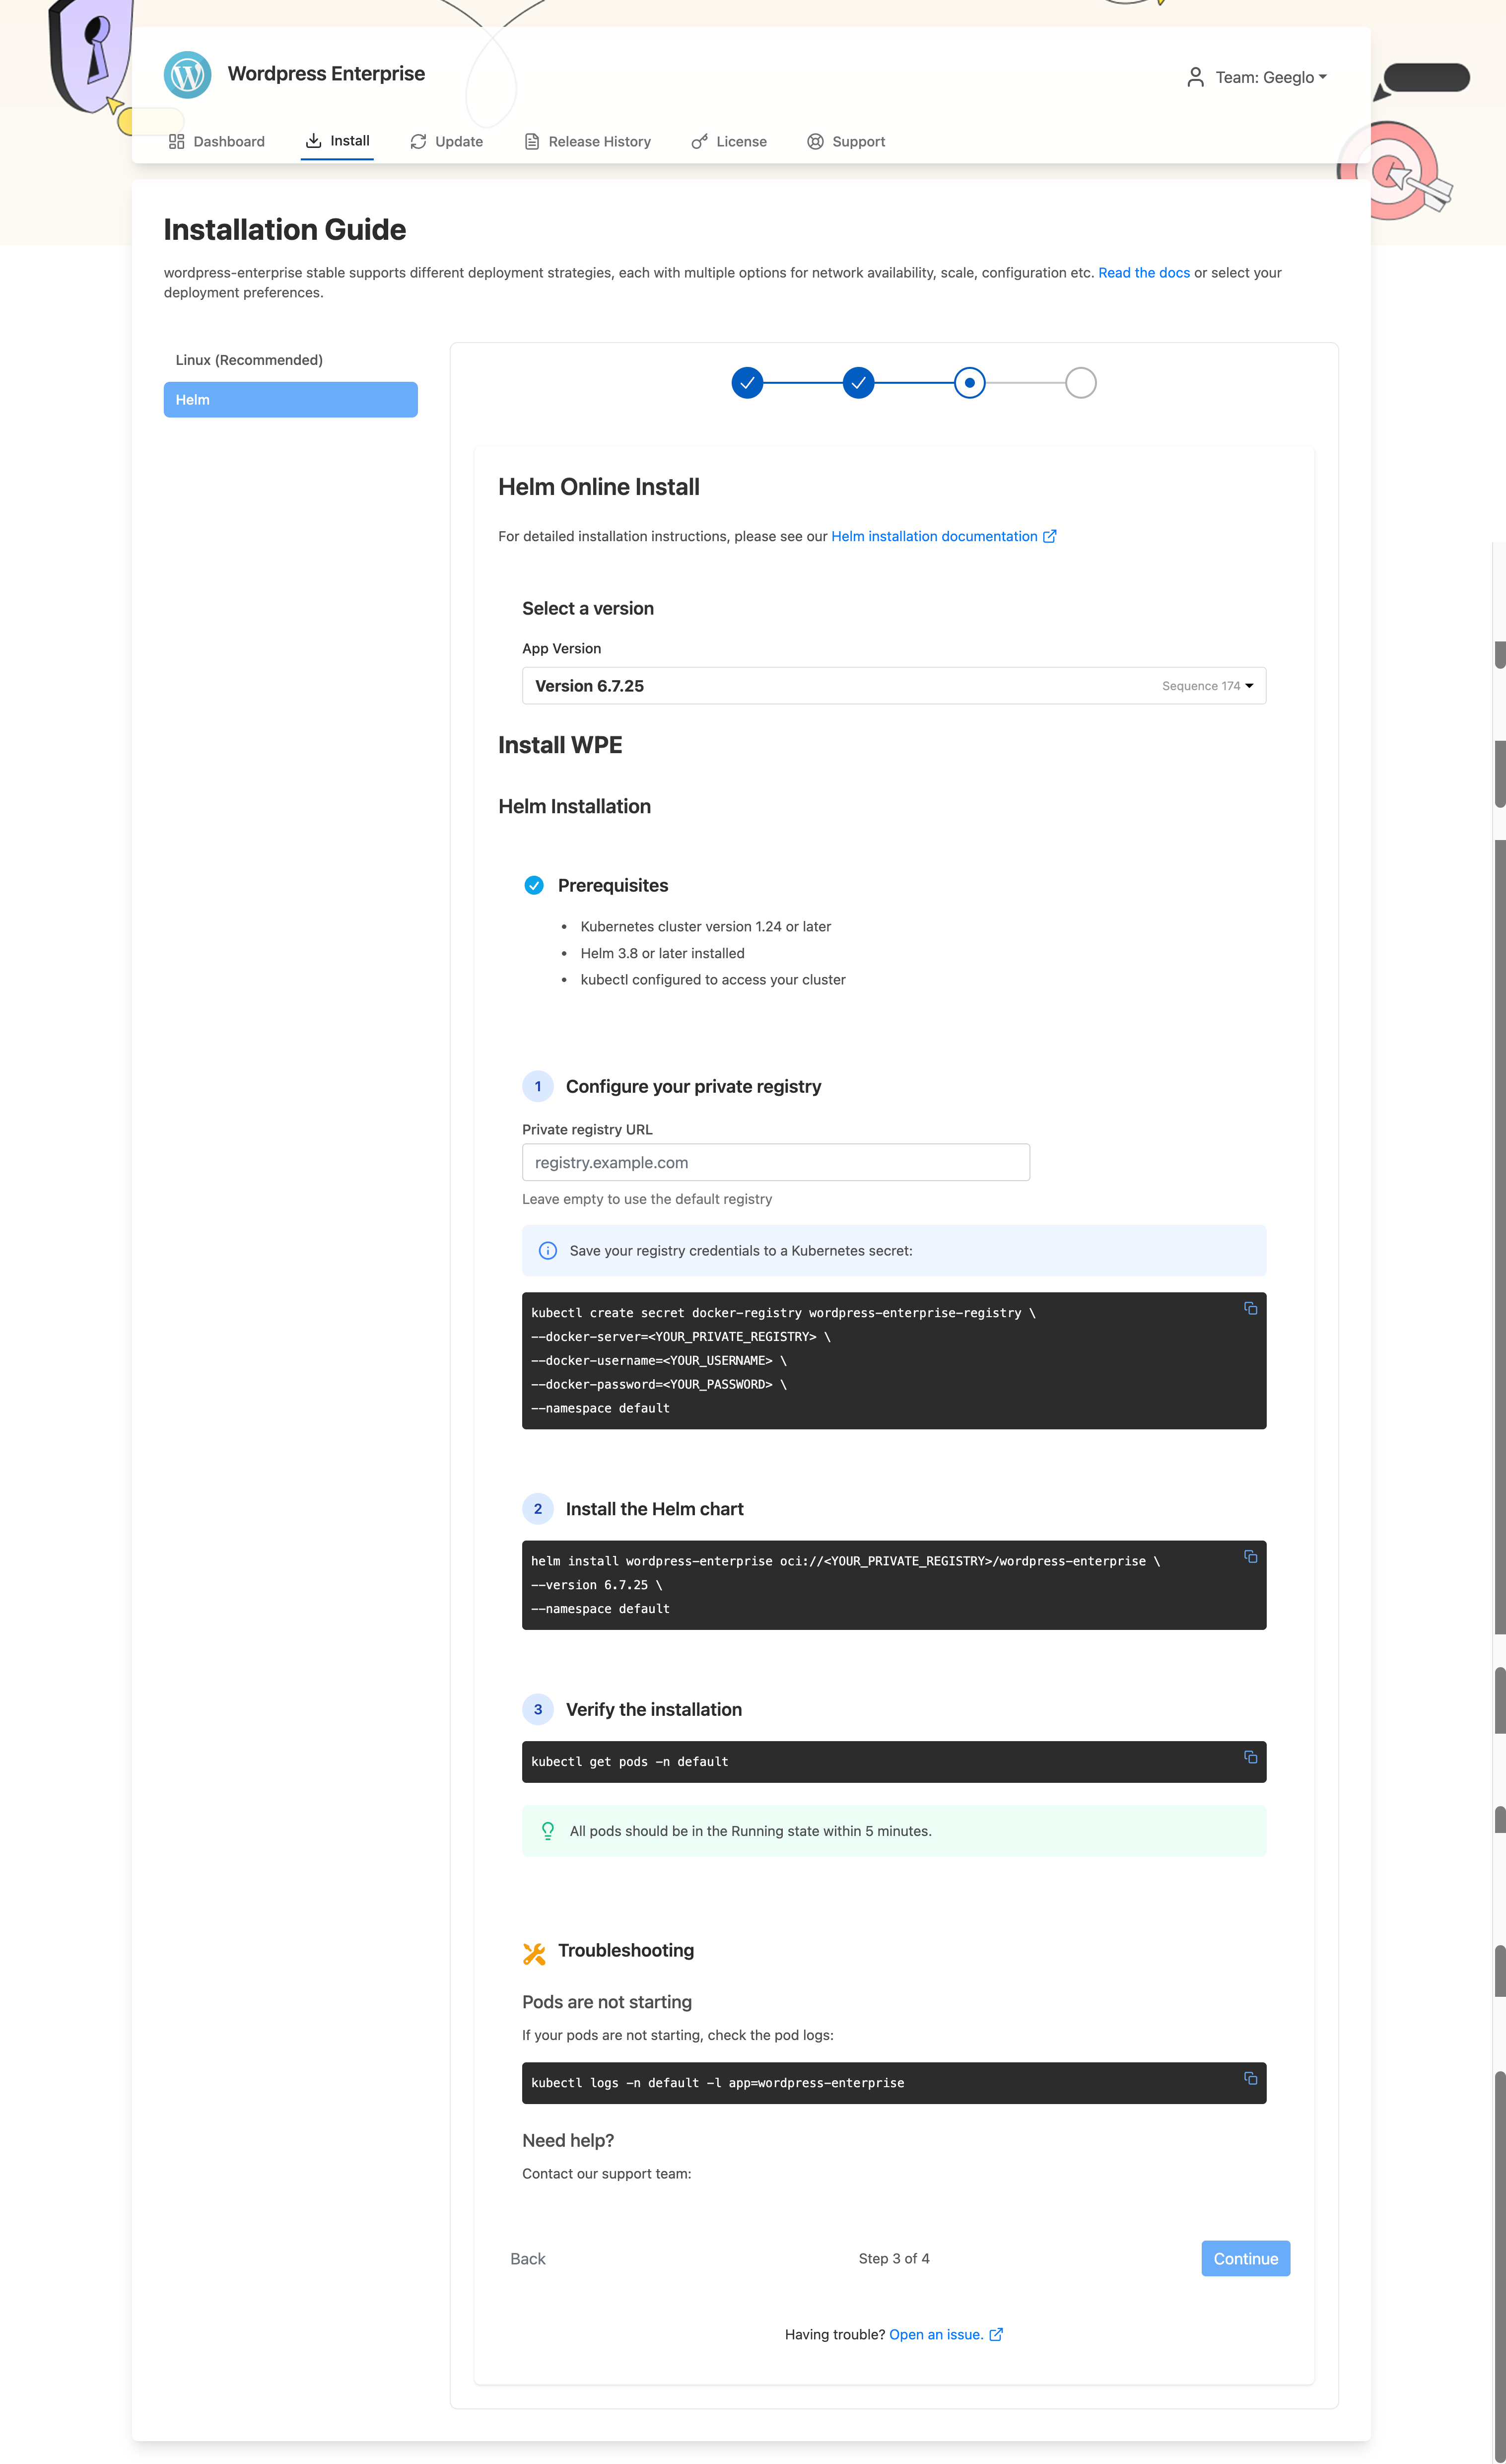
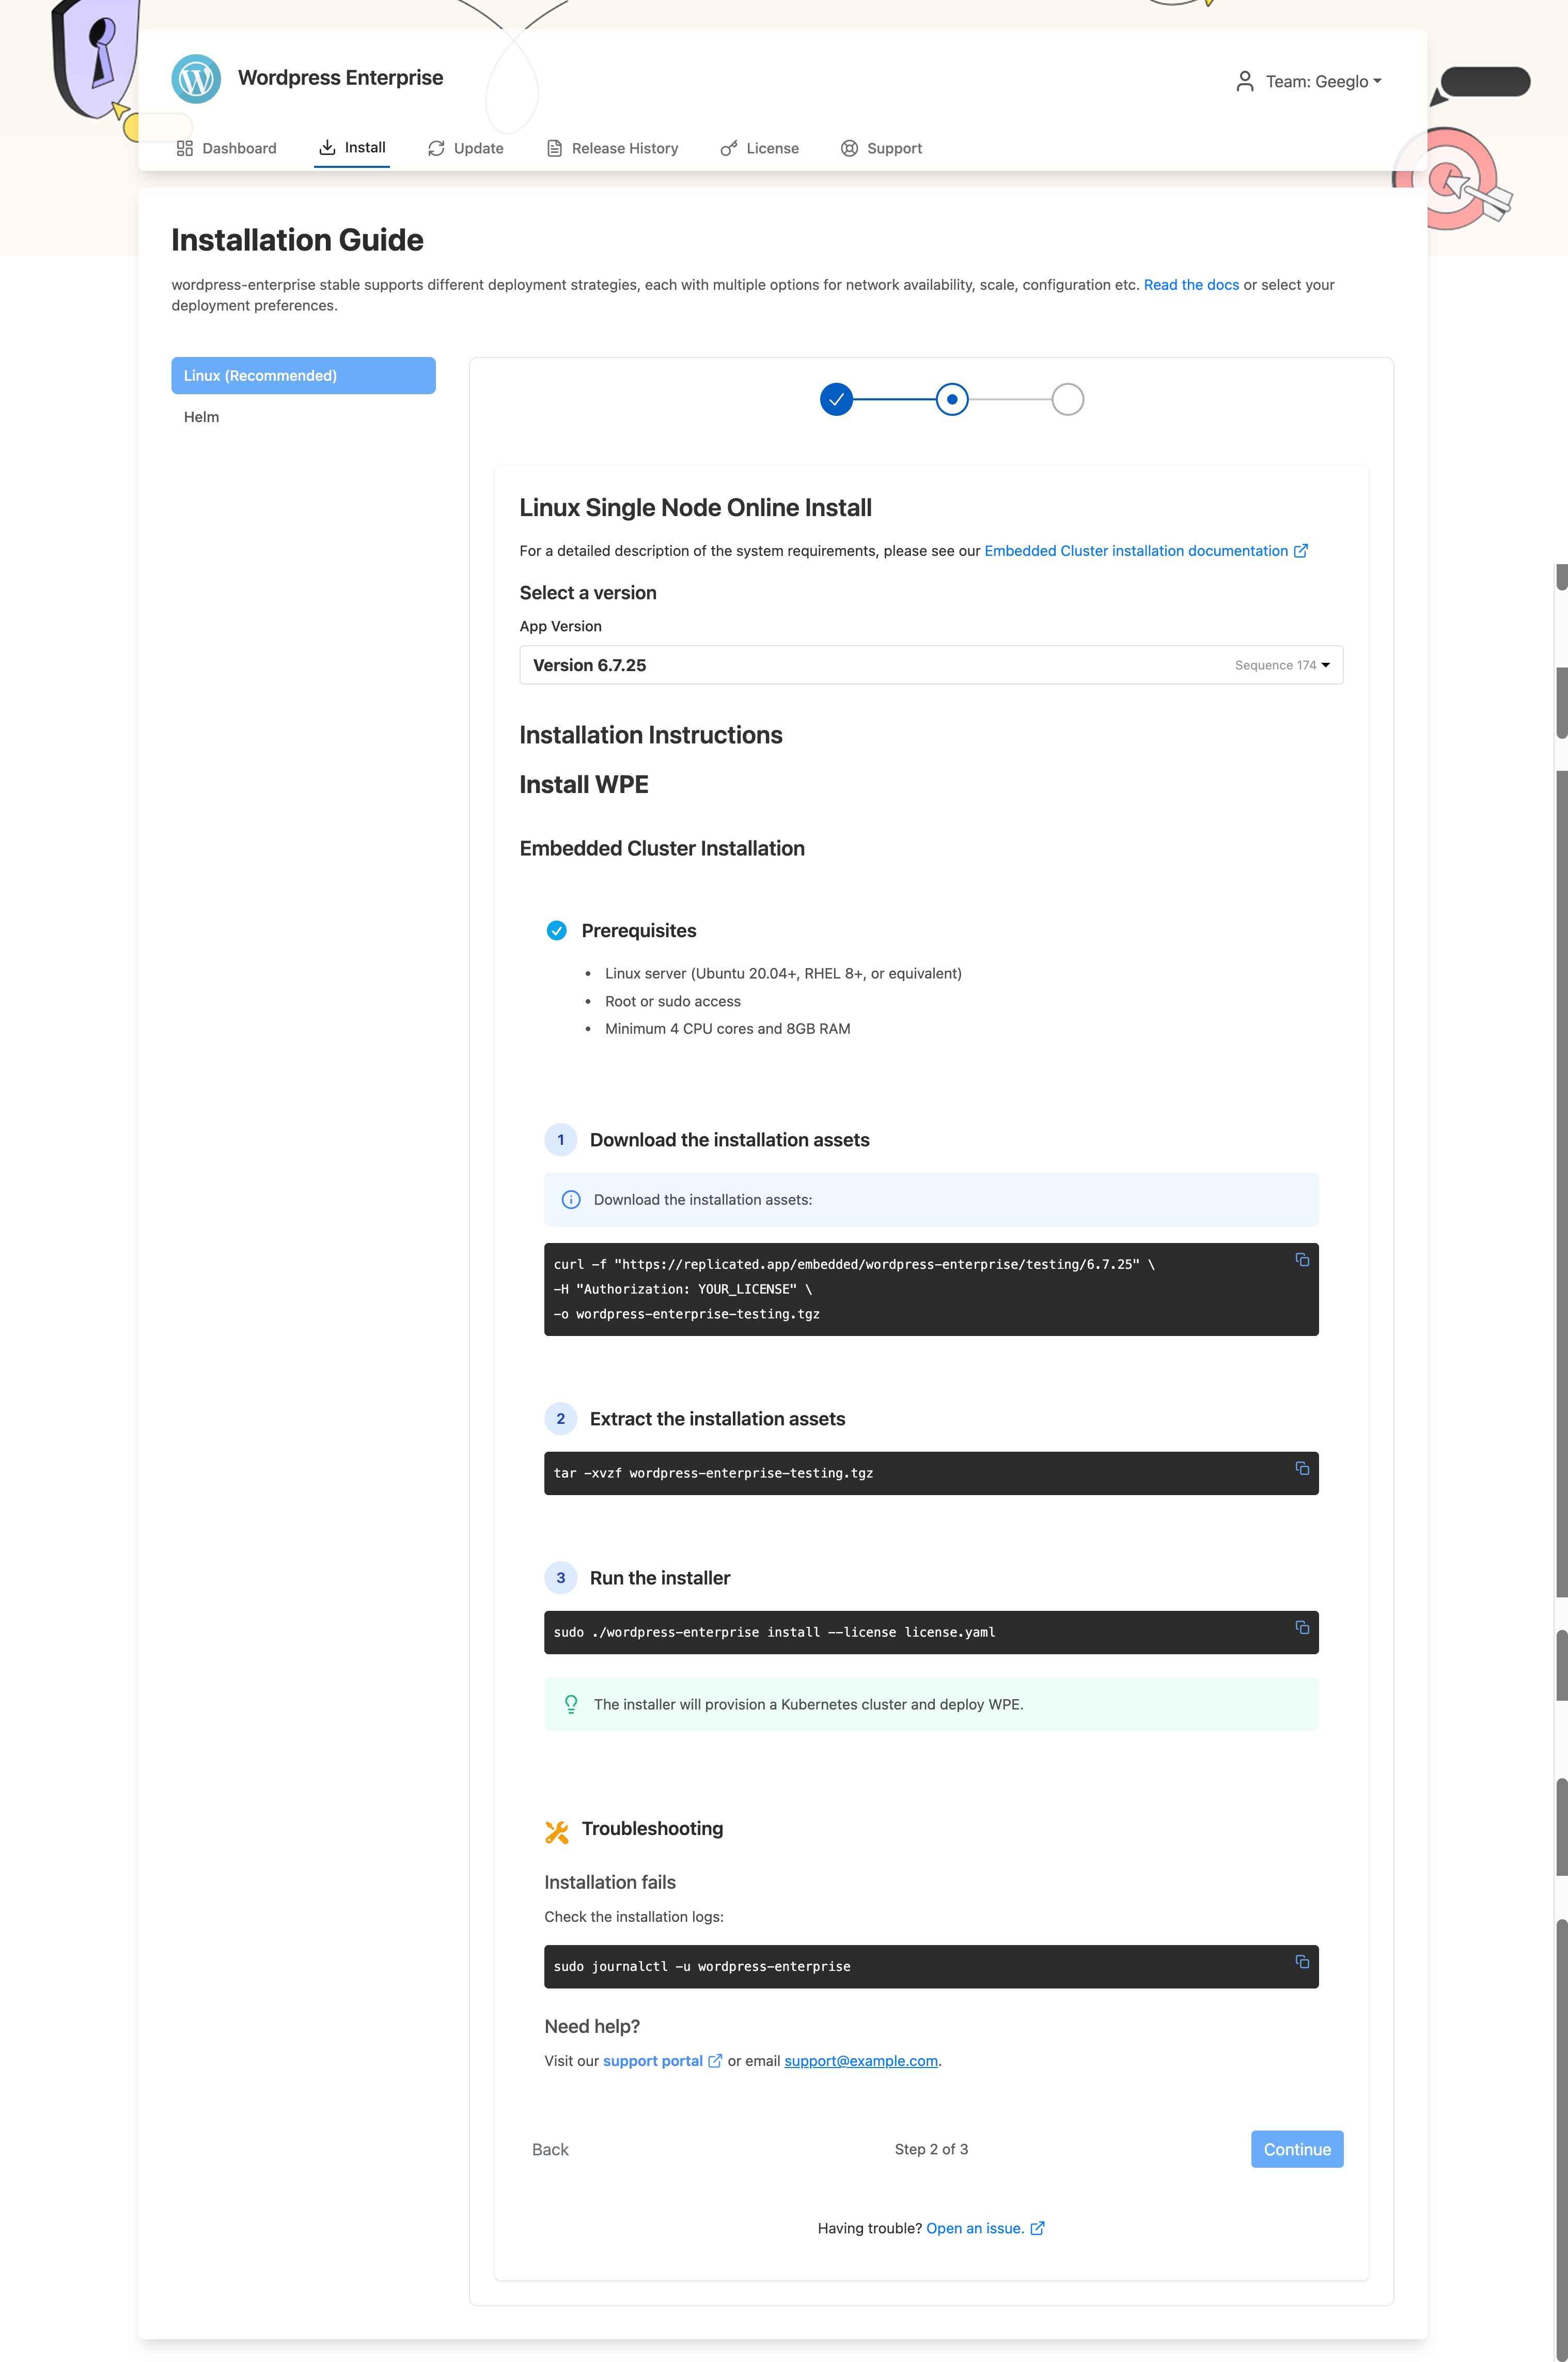
The following is an example of custom installation instructions that use MDX with conditional rendering based on installation type:
MDX Example
# Install \{app.name\}

<ConditionalRender when="installOptions.installType === 'helm'">
  ## Helm Installation

  <Prerequisites>
    - Kubernetes cluster version 1.24 or later
    - Helm 3.8 or later installed
    - kubectl configured to access your cluster
  </Prerequisites>

  <InstallStep title="Configure your private registry" stepNumber={1}>
    <PrivateRegistryInput />

    <Note>
      Save your registry credentials to a Kubernetes secret:
    </Note>

    <CommandBlock>
      {`kubectl create secret docker-registry ${app.slug}-registry \\
  --docker-server=<YOUR_PRIVATE_REGISTRY> \\
  --docker-username=<YOUR_USERNAME> \\
  --docker-password=<YOUR_PASSWORD> \\
  --namespace default`}
    </CommandBlock>
  </InstallStep>

  <InstallStep title="Install the Helm chart" stepNumber={2}>
    <CommandBlock>
      {`helm install ${app.slug} oci://<YOUR_PRIVATE_REGISTRY>/${app.slug} \\
  --version ${release.versionLabel} \\
  --namespace default`}
    </CommandBlock>
  </InstallStep>

  <InstallStep title="Verify the installation" stepNumber={3}>
    <CommandBlock>
      {`kubectl get pods -n default`}
    </CommandBlock>
    <br /><br />
    <Tip>
      All pods should be in the Running state within 5 minutes.
    </Tip>
  </InstallStep>

  <Troubleshooting>
    ### Pods are not starting

    If your pods are not starting, check the pod logs:

    <CommandBlock>
      {`kubectl logs -n default -l app=${app.slug}`}
    </CommandBlock>
    <br /><br />
    ### Need help?

    Contact our support team: <SupportLink href=\{branding?.supportPortalLink\}>Get Support</SupportLink>
  </Troubleshooting>
</ConditionalRender>

<ConditionalRender when="installOptions.installType === 'linux'">
  ## Embedded Cluster Installation

  <Prerequisites>
    - Linux server (Ubuntu 20.04+, RHEL 8+, or equivalent)
    - Root or sudo access
    - Minimum 4 CPU cores and 8GB RAM
  </Prerequisites>

  <InstallStep title="Download the installation assets" stepNumber={1}>
    <ConditionalRender when="installOptions.isAirgap">
      <Note>
        Download the air gap bundle to your server:
      </Note>
      <CommandBlock>
        {`curl -f "https://replicated.app/embedded/${app.slug}/${channel.channelSlug}/${release.versionLabel}?airgap=true" \\
  -H "Authorization: YOUR_LICENSE" \\
  -o ${app.slug}-${channel.channelSlug}.tgz`}
      </CommandBlock>
    </ConditionalRender>

    <ConditionalRender when="!installOptions.isAirgap && installOptions.proxyUrl">
      <Note>
        Download the installation assets via proxy:
      </Note>
      <ProxyURLInput />
      <CommandBlock>
        {`curl -f "https://replicated.app/embedded/${app.slug}/${channel.channelSlug}/${release.versionLabel}" \\
  -H "Authorization: YOUR_LICENSE" \\
  --proxy <YOUR_PROXY_URL> \\
  -o ${app.slug}-${channel.channelSlug}.tgz`}
      </CommandBlock>
    </ConditionalRender>

    <ConditionalRender when="!installOptions.isAirgap && !installOptions.proxyUrl">
      <Note>
        Download the installation assets:
      </Note>
      <CommandBlock>
        {`curl -f "https://replicated.app/embedded/${app.slug}/${channel.channelSlug}/${release.versionLabel}" \\
  -H "Authorization: YOUR_LICENSE" \\
  -o ${app.slug}-${channel.channelSlug}.tgz`}
      </CommandBlock>
    </ConditionalRender>
  </InstallStep>

  <InstallStep title="Extract the installation assets" stepNumber={2}>
    <CommandBlock>
      {`tar -xvzf ${app.slug}-${channel.channelSlug}.tgz`}
    </CommandBlock>
  </InstallStep>

  <InstallStep title="Run the installer" stepNumber={3}>
    <ConditionalRender when="installOptions.isAirgap">
      <CommandBlock>
        {`sudo ./${app.slug} install --license license.yaml --airgap-bundle ${app.slug}.airgap`}
      </CommandBlock>
    </ConditionalRender>

    <ConditionalRender when="!installOptions.isAirgap && installOptions.proxyUrl">
      <CommandBlock>
        {`sudo ./${app.slug} install --license license.yaml --https-proxy=<YOUR_PROXY_URL>`}
      </CommandBlock>
    </ConditionalRender>

    <ConditionalRender when="!installOptions.isAirgap && !installOptions.proxyUrl">
      <CommandBlock>
        {`sudo ./${app.slug} install --license license.yaml`}
      </CommandBlock>
    </ConditionalRender>
    <br /><br />
    <Tip>
      The installer will provision a Kubernetes cluster and deploy \{app.name\}.
    </Tip>
  </InstallStep>

  <Troubleshooting>
    ### Installation fails

    Check the installation logs:

    <CommandBlock>
      {`sudo journalctl -u ${app.slug}`}
    </CommandBlock>
    <br /><br />
    ### Need help?

    Visit our <SupportLink href="https://support.example.com">support portal</SupportLink> or email support@example.com.
  </Troubleshooting>
</ConditionalRender>
Given the MDX example above, the following show previews of how the Helm online install and Linux (Embedded Cluster) online install instructions would appear in the Enterprise Portal: